
Lips and teeth retouching
June 30, 2017 at 1:20:53 PM GMT+3Contents
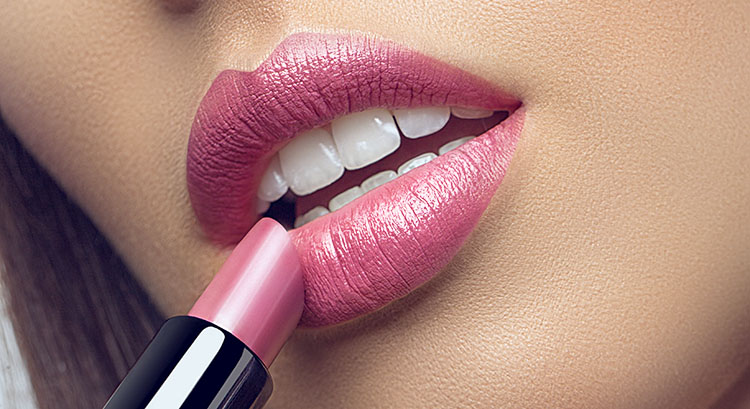
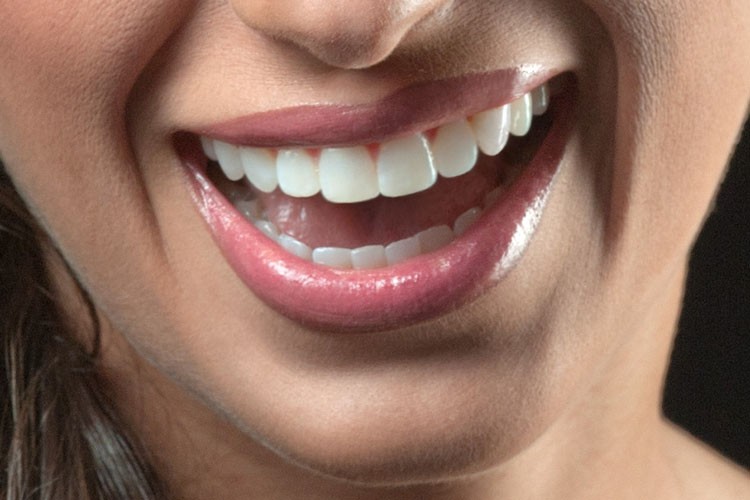
To make a smile flawless, Photza studio recommends not only teeth retouching but also lips retouching twice a day :). In this guide we will teach you how to enhance lips in Photoshop (as well as teeth).
We also recommend you to read the articles:
Lips augmentation
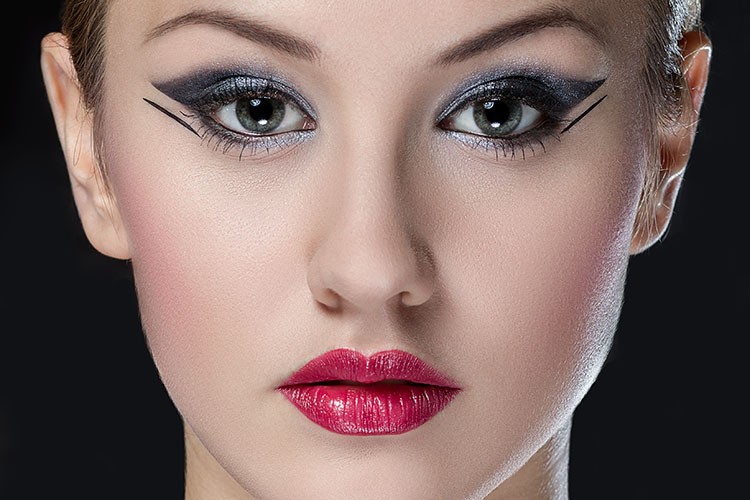
Big eyes always look very attractive. The large lips are also very attractive. Therefore, quite often the retouchers from online photo retouching studios have the task to increase the lips of the model in a photo. But too large lips will not look natural and most likely not beautiful. That is why, when using this technique, let the sense of proportion never leave you.

Step 1
Here is a photo we will work with and make the lips bigger in Photoshop. The lip size of the model makes her face symmetrical and proportional, but if you increase them slightly, then perhaps her appearance will become even more beautiful. Of course, this could be done with the Liquify filter, but, the method that we will use - correction without lip distortion, gives more realistic results.
Step 2
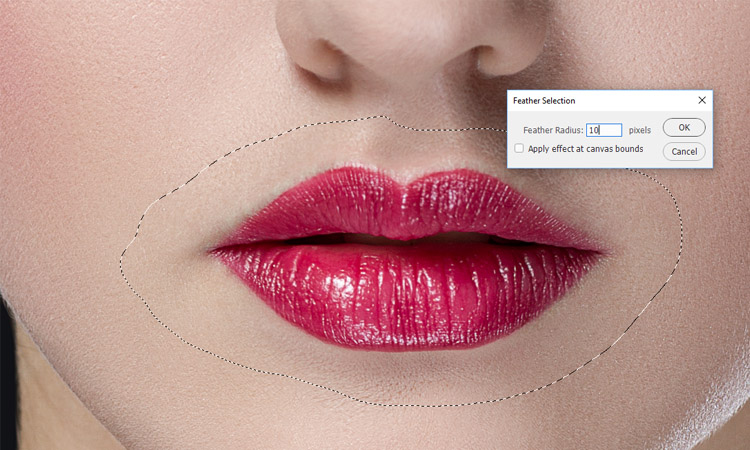
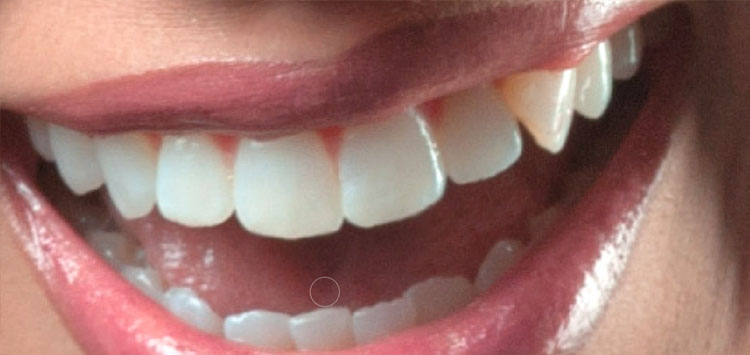
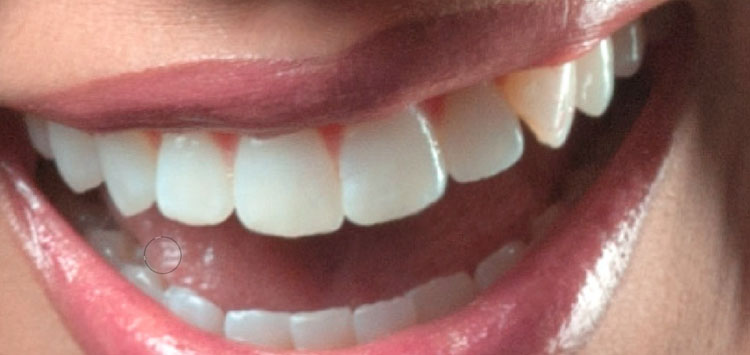
Use the Lasso tool to select the model's lips. Note that not only the lips but also the fragments of the skin around them were selected. It is the nuance that makes retouching so simple since it is much easier to apply skin tones than to imperceptibly superimpose the image of bright lips onto the skin tone. So do not be afraid to grab more space around the lips and create an arbitrary selection area, as we did in this case. To make the selected fragment properly and imperceptibly superimposed onto the image, you need to shade the edges of the selected area. You can do this with the command Select -> Modify -> Feather. In the Feather Selection dialog that appears, enter a value of 10 pixels and click OK. Copy the selection to a separate layer by pressing <Ctrl + J> (<⌘ + J>).
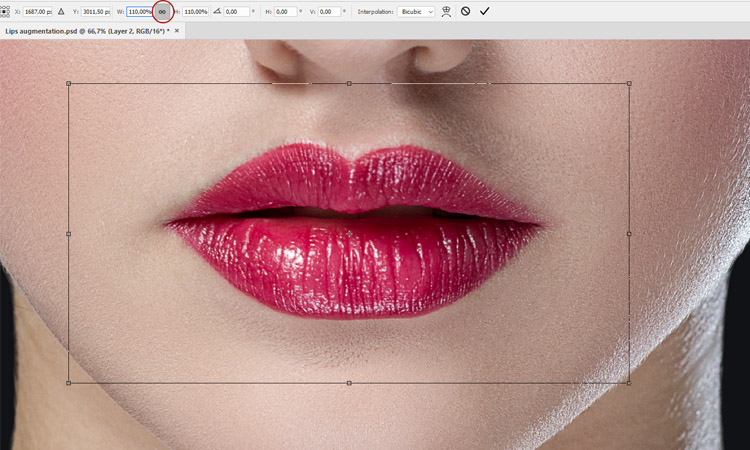
Step 3
Press <Ctrl + T> (<⌘ + T>) to execute the Free Transform command and display the bounding box around the fragment with the lips of the top layer. On the options bar, click on the icon that looks like a link in the chain, which is located between the W and H fields. Now the height and width of the selected fragment will change proportionally.
In the W field, enter 110% value, then in the H field, the value of 110% will appear automatically. Of course, you can simply drag the corner marker of the bounding box while holding down the <Shift> key, but in this case, you have the risk of increasing the lips more than it is necessary. Increasing the lips by 10% will make the results of retouching almost invisible. If you increase the lips shape, even more, the face will look unnatural, except when the model has very thin lips (in any case, the decision to increase the size of lips is up to you).
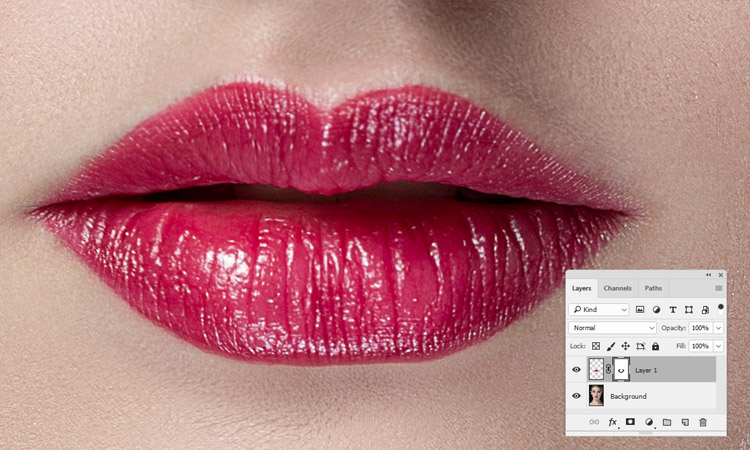
Step 4
Press the <Enter> (<Return>) key to save the results of the executed transformations, and do not be surprised if, at this stage, the correction results look proper. This is possible thanks to the strong feathering of the edges of the selected area. This allows to practically imperceptible impose skin tones from the top layer onto the skin tone of the lower layer. It is very easy to make sure in the correctness of the overlay. To do this, just turn off and turn on the visibility of the background layer of the image for several times to see if any visible edges remained after overlaying the copied area. If there are such edges, click on the Add Layer Mask icon, which is available at the bottom of the Layers panel to create a layer mask. Set the black color as the main color and use the Brush tool (select a small brush with soft edges) to draw the problem edges so that the results of the overlay become completely invisible. In this case, the layering was almost invisible, and we had to turn off the visibility of the layer several times to find any disadvantages.
Video tutorial
Applying gloss to the lips
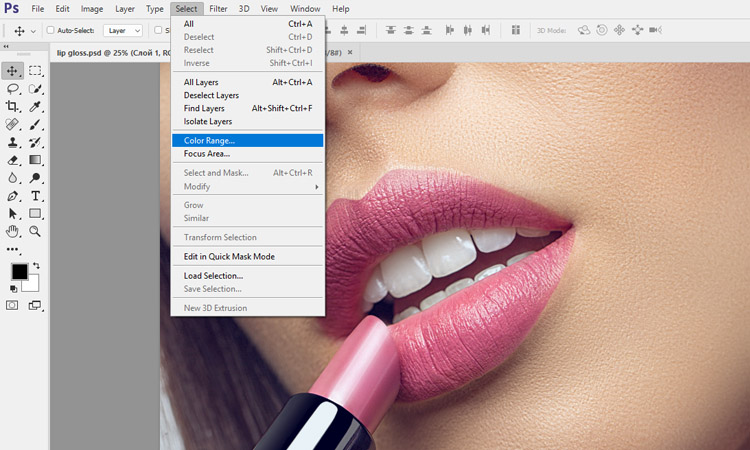
Retouches often have the task to add gloss to the lips of the model and enhance lips in Photoshop. In order to do this, you can use the Color Range command. With its help, we select the lightest fragments of the lips and then improve them as needed.

Step 1
First of all, zoom in the fragment with the image of the lips, so that you can see all the details. At the Select menu, click Color Range. This command is used to select the fragments of the selected color range. With its help, you can select just dark, just medium or just light tone images.
Step 2
At the top of the Color Range dialog box, select Highlights from the Select drop-down list. The default is Sampled Colors. In this case, when executing the Color Range command, the fragments of the hue that was set by the user when the Eyedropper tool is clicked on the image are selected, but it will probably come in handy in the future.
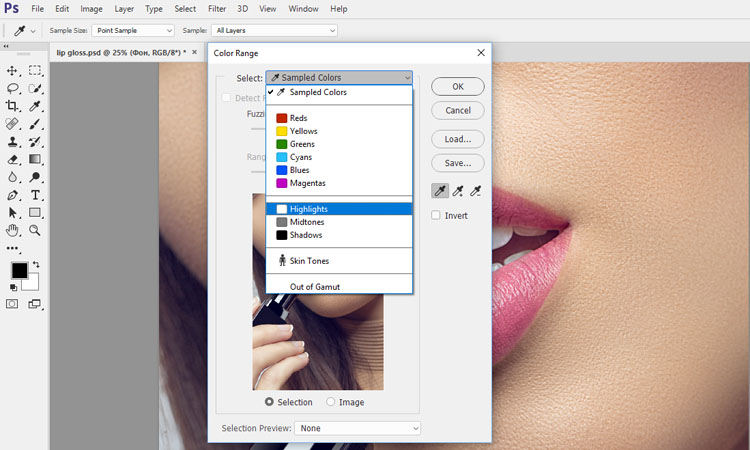
Step 3
Select Highlights from the Select drop-down list and click OK. All the areas of light tones will be highlighted automatically, as shown in the picture. Photoshop cannot display the tiniest of the selected fragments on the screen. Therefore, you need to understand that there are much more fragments allocated on the screen than fragments that are indicated on the image with a dash-dot line.
Step 4
Press <Ctrl + J> (<⌘ + J>) to copy the selection to a new layer. In the Layers panel, change the superposition mode of the top layer to Screen to make the selected pieces much lighter. Of course, at this stage, the image has completely lost its appeal, and this is because we need to lighten only the light tone of the lips, rather than the entire image. As a result of such global lightning, the skin of the model looks rough and scabrous.
Step 5
While holding down the <Alt> (<Option>) key, click the Add Layer Mask icon, which is available at the bottom of the Layers panel. This will hide the results of the lightening on the layer with the Screen overlay mode with the help of the black mask and restore the original image appearance. Set the white color as the main color on the toolbar and select the Brush tool. Using a small brush with soft edges and an opacity of 100% draw the light fragments of the lips. So you will open the clarified fragments of the layer on which the Screen overlay mode is applied, and add shine to the lips of the model.

Step 6
Draw light sections of the lower and upper lips to add gloss to the lips. If the effect you created seems to be too strong, you can always reduce the opacity of the top layer of the image. This is the advantage of performing transformations on a separate layer - you can always adjust the degree of the created effect.
Step 7
And what should we do if the created effect seems to be insufficient? To increase it, you need to duplicate the layer with the Screen overlay mode using the <Ctrl + J> (<⌘ + J>) key combination again, and the effect will be twice as bright. Perhaps, after that, the effect really seems to be too strong. In this case you can again reduce the opacity of the top layer to achieve the optimal result.
Video tutorial
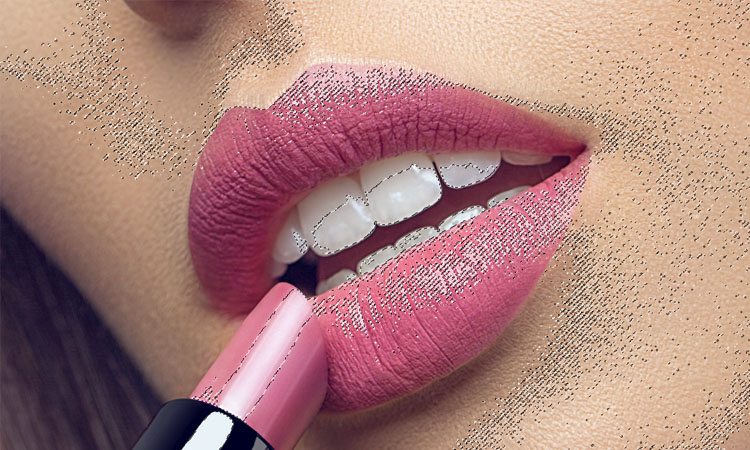
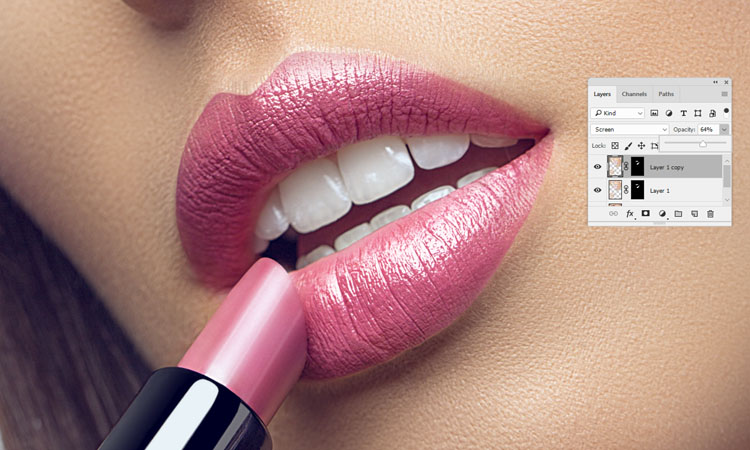
Applying lipstick and changing its color
If you need to change the color of the lipstick or to apply lipstick to the lips of a model, you can do this in Photoshop. We will talk about methods that allow applying lipstick to the lips easy enough.

Step 0
We named this step 0 since it is not mandatory. You can select the area of the lips with the Lasso tool, but in the future, we will have to work with a brush that would ideally recolor the lips. This effect is very difficult to achieve using the selection.

Step 1
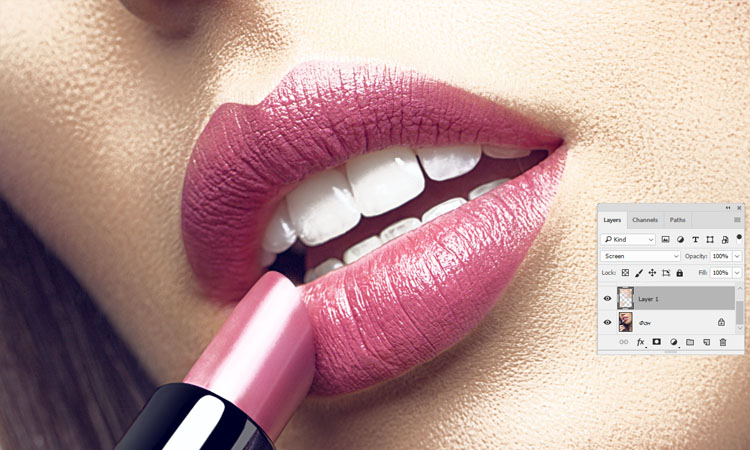
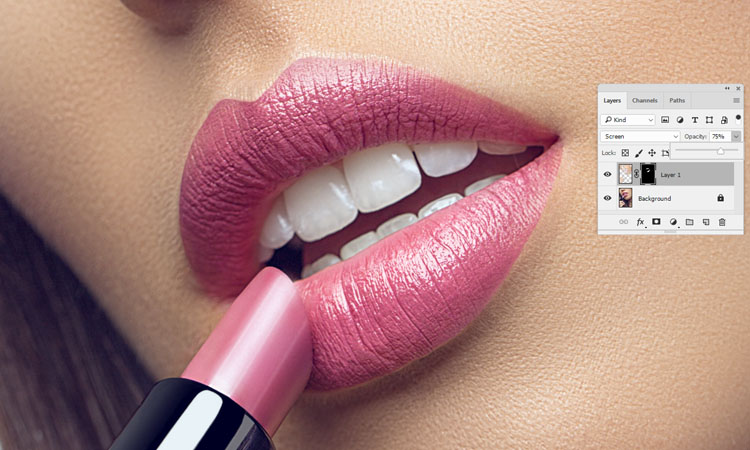
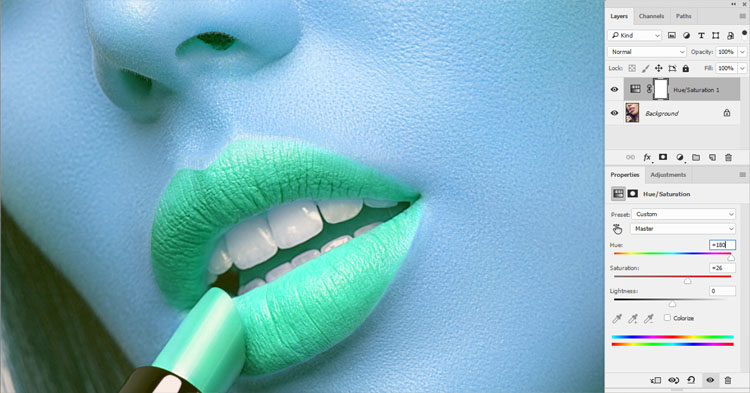
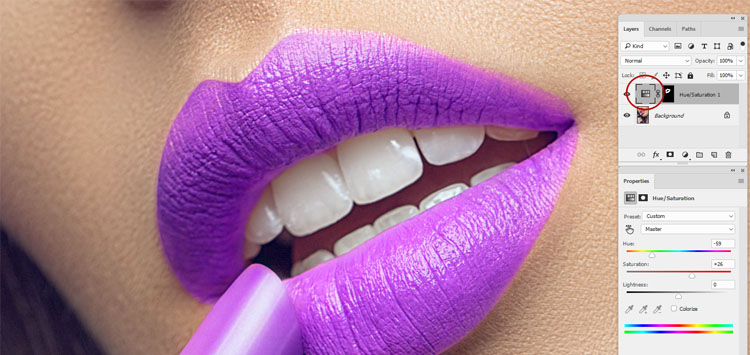
Click on the Create New Adjustment Layer icon, which is available at the bottom of the Layers panel, and select Hue / Saturation from the menu that appears. As you drag and drop Hue / Saturation the color of the lips changes. Choose the best in your opinion lipstick shade.
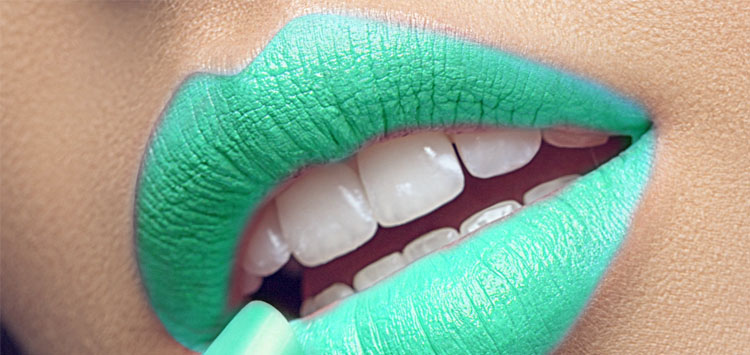
Step 2
Make an inversion using the key combination <Ctrl + I> (<⌘ + I>) or using the menu Image-> Adjustments -> Invert. Activate the Brush tool. Set the white color as the primary color and draw on the lip mask. It is important to remember that when applying lipstick, people often go beyond the contours of the lips. Therefore, it will be useful for you to zoom in on the area of the lips and make sure that you hide only the fragments you need and that the original color of the lipstick does not appear anywhere.
Step 3
If you got out of the edges, then set the black color of the brush with the <X> key and draw the areas that accidentally changed color. To make a neat contour that will not break out – zoom in the image, take a soft brush of a small size, change its stiffness to 60-70% and carefully draw the contours of the lips.

Additionally:
If you need to change the lip color again, just click on the Layer thumbnail and on the Properties tab select the appropriate color using the Hue and Saturation sliders.
Video tutorial
Changing the shade of the lips
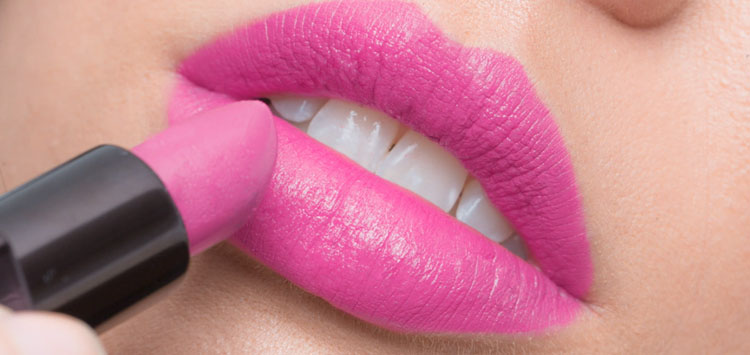
This is a great technique using which you can make the lips really standing out in the image - change the shade of the lips or remove lipstick. To do this, at first, change the shade of the lips, and then lighten the natural light fragments of the lips. After the final improvements, we will get the best results.
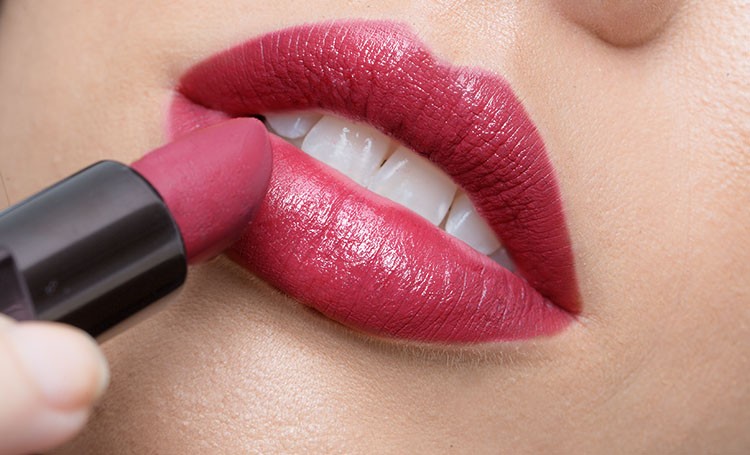
Step 1
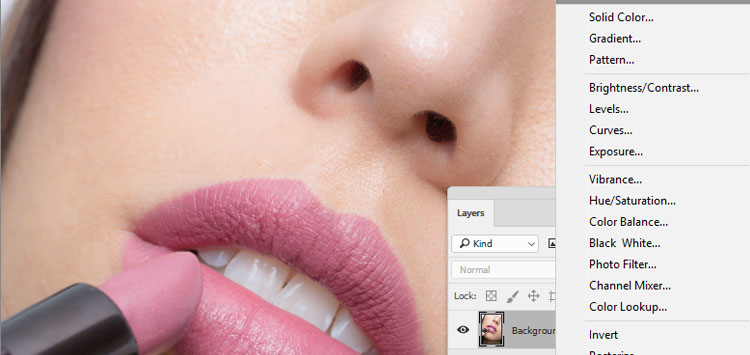
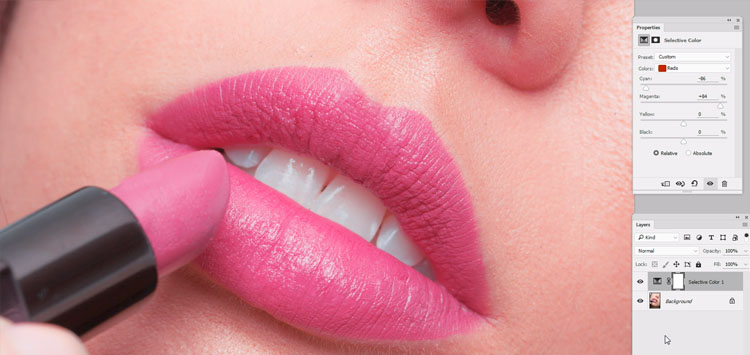
Hereis a photo, where we will emphasize the dark shades of the lips. If you want to completely change the color of the lips, it's better to use the Hue / Saturation adjustment layer, as was done in the previous example. But in this case, we just want to change and improve the existing color. Click on the Create New Adjustment Layer icon, which is available at the bottom of the Layers panel, and select Selective Color from the menu that appears.
Step 2
For the Selective Color adjustment layer in the Adjustments panel, the default is changing the red tints. Therefore, we only need to drag the three upper sliders to change the shade of the lips. (The lowest slider in this window is Black, which is responsible for the brightness of the red shades of the image.) First, drag the Cyan slider to the left. Slide the Magenta slider to the right. Obviously, at this stage, we will not achieve a change in just the color of lips but will change the red shades for the entire image. But there is nothing to worry about. Now we will fix this.
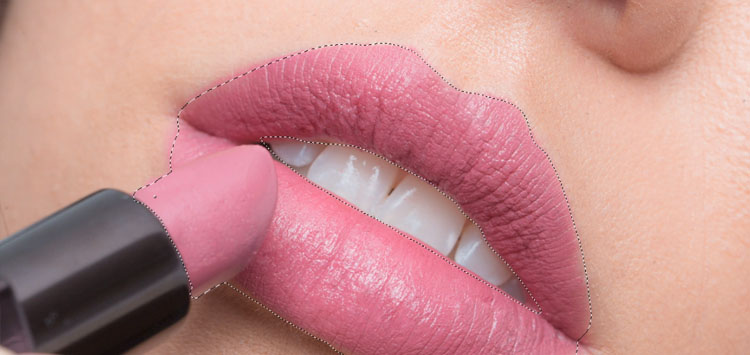
Step 3
Press the key combination <Ctrl + I> (<⌘ + I>) to invert the Selective Color adjustment layer mask. This will hide the results of conversions with a black mask. Set the white color as the main color on the toolbar and activate the Brush tool. Choose a small brush with soft edges and opacity of 100%. Gently paint the lips on the mask, thereby restoring the shadow that was created on the corrective layer of the image of the lips. Completely sketch the image of the lips. (For such retouching, it's very convenient to use a graphic tablet, which will take a few seconds to paint over.)

Step 4
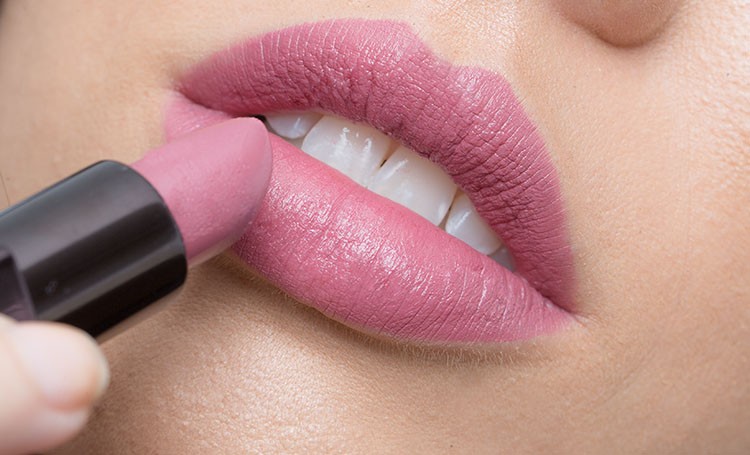
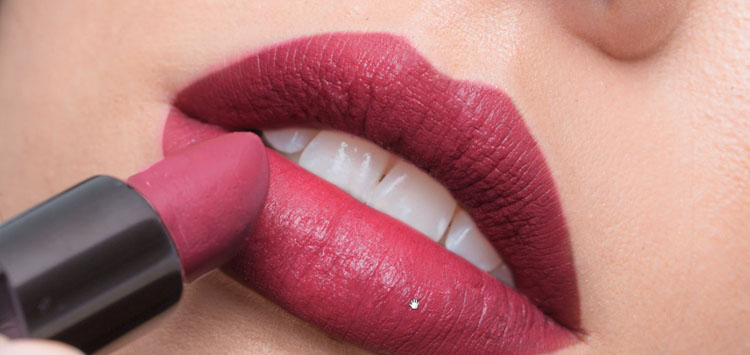
If you need another shade, drag the Yellow slider to the left. In this case, we dragged it to the -55% position. Look at how the chosen shade has changed. If you need a reddish shade, drag the Yellow and Cyan sliders to the right.
Step 5
If you need a rich ruby red lipstick, do the following: at first set all Selective Color sliders to 0 or just select Default from the drop-down list at the top of the window to restore the original lip color. While holding down the <Ctrl> key (<⌘>), click the thumbnail of the mask. As a result, a selection will appear that is created based on the mask on which you selected the model's lips.
Step 6
Click on the Create a New Layer icon, which is available at the bottom of the Layers panel, and create a new layer. Use the <D> key to set the color black as the main one and press <Alt + Backspace> (<Option + Delete>) to fill the selection with black color. At the top of the Layers panel, change the blend mode for this layer to Soft Light. As a result, the lips will acquire a rich ruby red color. Since there is an adjustment layer under this layer, you are able to control the colors.
Additionally:
At this step the transformation of hues can be completed. But if you have some free time, you can further highlight the brightest areas of the lips. To do this, you can use the technique described in the section on "applying gloss."
Video tutorial
Tooth alignment
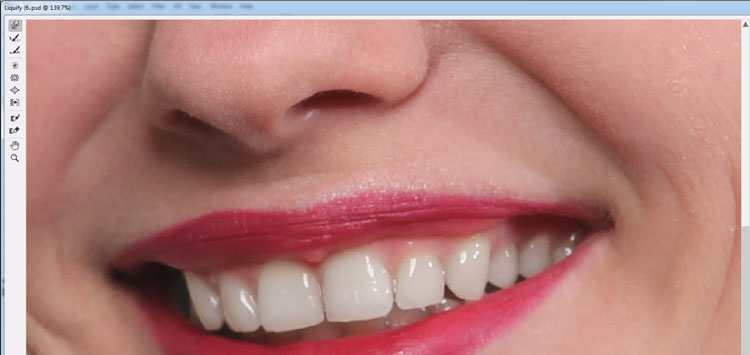
Depending on the particular person in the photo, this type of retouching can be either easy and quick or time-consuming enough. Fortunately, most of these problems can be solved using the Liquify filter. But in some cases, one or even several teeth need to be created, as they say, from scratch.

Step 1
We need to lengthen the two teeth, which are located on both sides of the central incisors. Then will remove the stains on the canines and correct the gap near the right canine and align the lower teeth of the model.
From the Filter menu, select the Liquefy filter. In the dialog box that opens, increase the scale of the fragment with the mouth image by pressing the key combination <Ctrl + +> (<⌘ + +>). Select the top tool on the Liquefy - Forward Warp filter toolbar. The main thing of successful work with this tool is to perform transformations with the help of numerous short and accurate movements. Instead of taking a large brush and strongly dragging it along the image, it is better to take the brush that is a little wider than the problematic fragment and fix the defect with a few short strokes. With the short and careful movements, directed upwards, try to shorten the both central upper teeth a little. Be sure to tighten the area between these teeth to make them even. You can simultaneously even out the bottom surface of these teeth. To do this, significantly reduce the size of the brush and use gentle strokes to pull up the protrusions upwards. Now we will work with the teeth located on the both sides of the central teeth. In the same way (just with a smaller brush), drag the lower edges of the teeth down to just slightly extend them and align the upper row of teeth. Make them almost the same in length with the central teeth, but slightly shorter.
Tip: To quickly compare the original and edited fragments - reset and check the Show Backdrop checkbox, which is available in the lower-right corner of the Liquefy filter dialog box.
Using the same tool, we'll try a little "to blunt" the left canine. With short and accurate movements, drag the tip of the canine slightly upward. Now it is not so sharp. After working with the Liquify filter, we retouch the gap near the right canine by hand. In the meantime, you can work with other teeth in the filter dialog box.
Step 2
With the help of the same tool, try to align the bottom row of teeth. The middle lower tooth is slightly turned to the left. Activate the Forward Warp tool, click the brush on the left edge of the tooth and drag the tool to the right to align the tooth. It remains to do the same with the rest of the lower teeth, turning them to the right or left, and align their upper edges with simple manipulations of the same tool.
If you look at the next tooth on the left, it becomes obvious that its left edge is too low. Pull it up a little with the same tool. Adjust all lower teeth so that they line up in one line.
Do the same with the next tooth on the left. Its edge also needs to be lifted. Here is more work for the Liquify filter. And now you can see that the teeth of the lower jaw became straighter. After brushing the teeth on the left side, go to the teeth on the right side.
To simplify the subsequent work. We need to sharpen this canine slightly, lifting its left edge. Use a larger brush. Now you can click the OK button to close the Liquify filter dialog box and apply the changes you made. It's time to start filling the gap near the right canine.
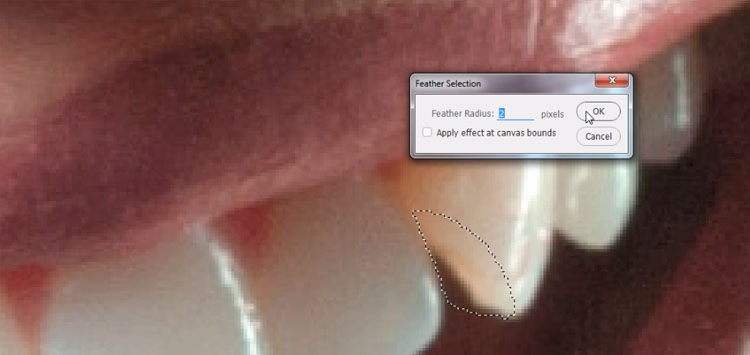
Step 3
We need to select the area In the image that you want to add to the tooth image. Therefore, we selected a gap near the right canine and part of the tooth with the Lasso tool. You can also do this with the help of the Pen tool. Using it you can create an exact path and convert it to a selection area, but this takes a long time. Since we use a graphic tablet, it is easy to create the desired selection using the Lasso tool. To make the transition from the selected fragment to the adjacent tooth as smooth and imperceptible as possible, it is necessary to shade the selected area with the command Select -> Modify -> Feather. In the Feather Selection dialog box, enter a value of 2 pixels and click OK.
Step 4
Create a new layer by clicking on the Create a New Layer icon at the bottom of the Layers panel. Clone the desired pixels with the Clone Stamp tool. Select a small soft-edged brush and hold down the <Alt> (<Option>) key, click on the light part of the tooth to select the pixels for cloning. Draw a gap between the teeth from top to bottom. Do not worry that you can accidentally sketch unnecessary fragments of the tooth. When pre-creating a dedicated area, you put a sort of a fence outside of which you cannot get out.
Step 5
Press <Ctrl + D> (<⌘ + D>) to deselect and evaluate the results. Use the key combination <Ctrl + E> (<⌘ + E>) to merge the layers. In this case, the tooth on the image looks a little strange, but it is caused not by its shape, but by the specific lighting of the real scene. The tooth appears lighter than the rest and at the same time it acquires a yellowish hue. That is why we have to correct this defect. Use the Lasso tool or any other convenient selection tool and select the lightest yellowish tooth. To slightly soften the edges of the selection, blend the selected area by 1 pixel.
At the bottom of the Layers panel, click the Create New Adjustment Layer icon and choose Hue / Saturation from the menu that appears. In the drop-down list at the top of the Adjustments panel, select the Yellows option and drag the Saturation slider to the left to eliminate the yellowness of the tooth. In this case, to make the color of the problem tooth similar to the color of the other teeth, we had to drag this slider almost to the left to the stop. Deselect the selection.
Step 6
The last thing that is required in the process of working on this image is to lighten the tooth that is to the left of the tooth, which we have just edited. This tooth is in the shadow, and we need it not to be different from the others. Select the problem tooth with the Lasso tool and blend the edge of the selection with 2 pixels.
At the bottom of the Layers panel, click the Create New Adjustment Layer icon and select Levels from the menu that appears. In the Adjustments panel, the Levels sliders appear. In the drop-down list above the histogram select Red. Drag the gray limiter below the histogram to the right to reduce the red color on the selected fragment and thus to lighten it. The images that you will work with in future differ from each other, so in the above drop-down list, you will need to go through all the colors and experimentally determine which one is suitable for lightening or darkening the fragment. To make the tooth less different from the others, it may be necessary to slightly drag the black limiter as well.
Also try to drag the black limiter of the Input Levels for Green, and then for the Blue option.
Video tutorial
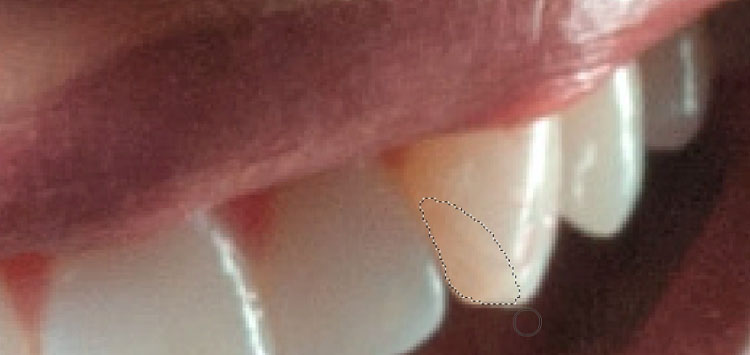
Teeth whitening and removal of the yellow plaque
White teeth look fine. But most people have teeth of a different intensity of yellowness. As a rule, the retouchers need to eliminate this deficiency and remove the yellow tint (when teeth whitening in Photoshop) that it does not catch your eye. In this section, we will discuss how to retouch teeth in both above cases.

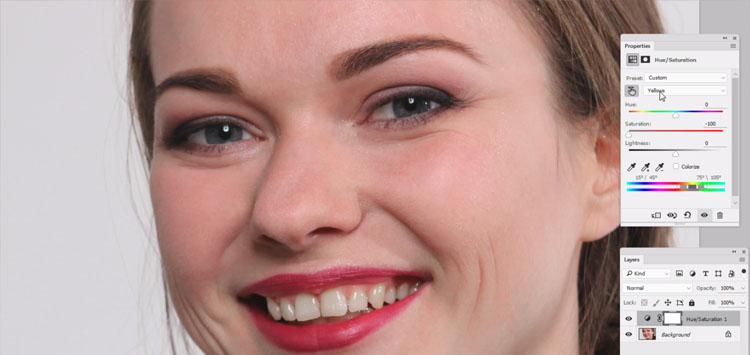
Step 1
Zoom in on the tooth fragment and click on the Create New Adjustment Layer icon, which is available at the bottom of the Layers panel.
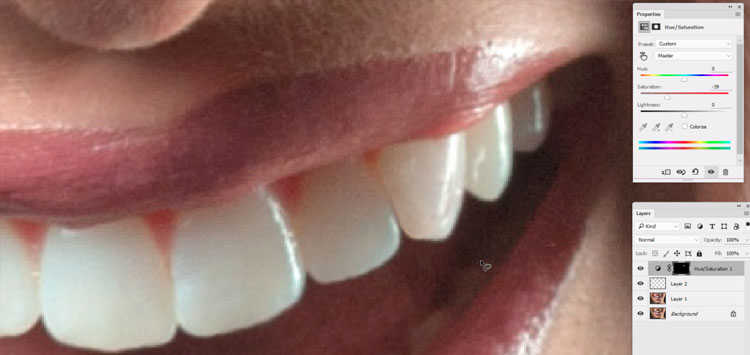
Select Hue / Saturation from the menu that appears. In the second drop-down list on the Adjustments panel, change the value from Master to Yellows. Drag the Saturation slider all the way to the left. This will remove the yellow tint from the entire image. Now, look how the teeth of the model look. In 99% of cases, the teeth will look almost perfect. But in this case, we still can see some shade on the tooth enamel. Typically, this means that in the image of the teeth there is also a shade of red.
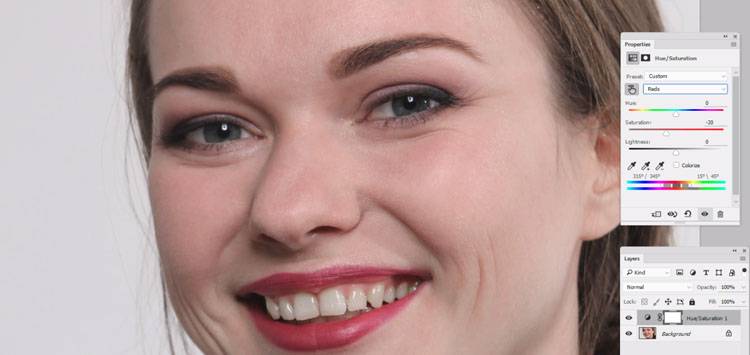
Step 2
In the same drop-down list, select the Reds value, slightly decrease the Saturation setting and the teeth will look fine. Of course, in this case the face of the model completely lost its vivid colors. But we are going to correct this in the next step.
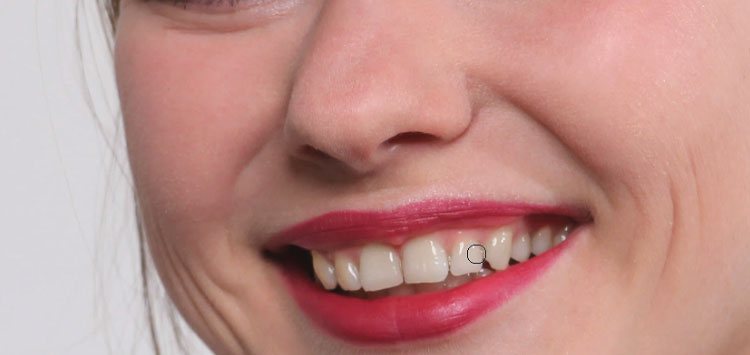
Step 3
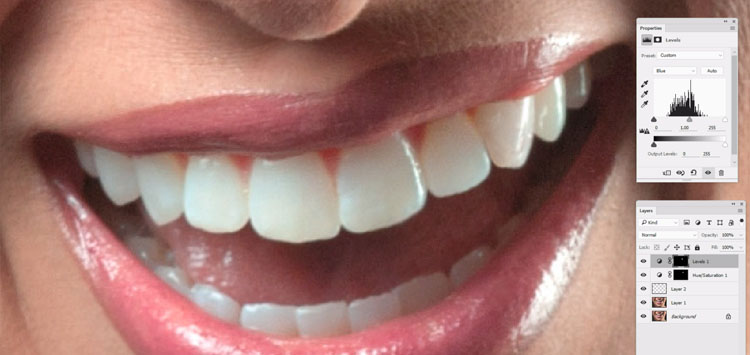
Press the key combination <Ctrl + I> (<⌘ + I>) to invert the mask. Now we need to open only the necessary fragments on this mask. Use the Brush tool, set the white color as the main one on the toolbar and draw the image of the teeth with a brush. Use a small brush with soft edges for this. Gradually the yellow tint will be completely removed from the teeth of the model.
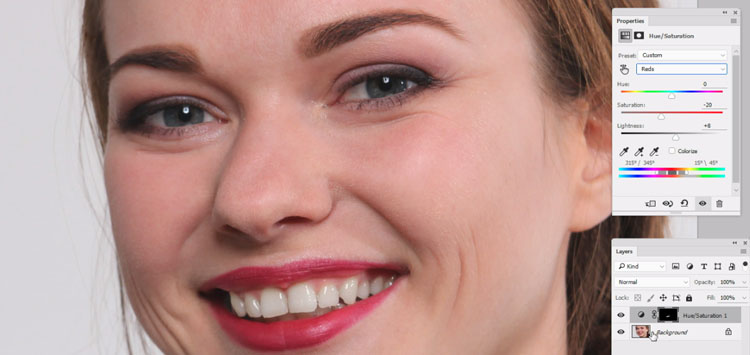
Step 4
Draw all the teeth to completely get rid of the yellow. So we created a mask for the model’s teeth. In the drop-down list at the top of the Adjustments panel, select Master and drag the Lightness slider a little to the right. If necessary, you can do the same procedure, but for Reds and Yellows.
If it happens that the teeth are whitened too much, then you need to reduce the value of the Opacity parameter of the correction layer of the Hue / Saturation function.
Step 5
To complete the retouching of this image, you can tweak the teeth of the model which slightly protrude with the help of plastic. But before that, you need to create a new layer in which all the layers of the image will be merged. Use the key combination <Ctrl + Alt + Shift + E> (<⌘ + Option + Shift + E>) for this.
Use the Forward Warp tool and tighten the problem tooth with short mouse clicks. You will find that it is very easy to do this, and the whole operation takes no more than a few seconds. Click OK to finish the image retouching.
Video tutorial of teeth whitening in photo using Photoshop